Adafruit Twinket M0 を CircuitPython で動かしてみた! [徒然日記]
SPRESENSE で CircuitPython を動かしてみましたが、他のボードではどんなだろうと思って、Adafruit 純正の "Trinket M0" を試してみました!
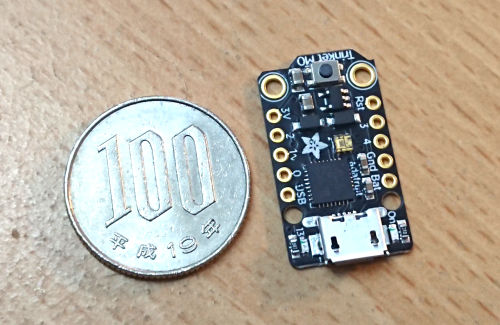
基板が小さい!大きさはおおよそ 15mm x 27mm です。これSPRESENSEのアドオンボードにできるレベルですね。電源を入れるといきなり、CIRCUITPY:ドライブが見えました。CircuitPython がプリインストールされていました。

しかも NeoPixel がオンボードで光り方が変わって綺麗!!SPRESENSE でこの NeoPixel のライブラリ使えるかなぁ。使えねぇだろうなぁ。

ご参考までにこんなコードが書かれていました。思ったよりも複雑…
動いている様子を見たい方はこちらの動画をどうぞ!😃
(^^)/~
")

")
基板が小さい!大きさはおおよそ 15mm x 27mm です。これSPRESENSEのアドオンボードにできるレベルですね。電源を入れるといきなり、CIRCUITPY:ドライブが見えました。CircuitPython がプリインストールされていました。
しかも NeoPixel がオンボードで光り方が変わって綺麗!!SPRESENSE でこの NeoPixel のライブラリ使えるかなぁ。使えねぇだろうなぁ。
ご参考までにこんなコードが書かれていました。思ったよりも複雑…
# Trinket IO demo
# Welcome to CircuitPython 3.1.1 :)

import board
from digitalio import DigitalInOut, Direction, Pull
from analogio import AnalogOut, AnalogIn
import touchio
from adafruit_hid.keyboard import Keyboard
from adafruit_hid.keycode import Keycode
import adafruit_dotstar as dotstar
import time
import neopixel

# One pixel connected internally!
dot = dotstar.DotStar(board.APA102_SCK, board.APA102_MOSI, 1, brightness=0.2)

# Built in red LED
led = DigitalInOut(board.D13)
led.direction = Direction.OUTPUT

# Analog input on D0
analog1in = AnalogIn(board.D0)

# Analog output on D1
aout = AnalogOut(board.D1)

# Digital input with pullup on D2
button = DigitalInOut(board.D2)
button.direction = Direction.INPUT
button.pull = Pull.UP

# Capacitive touch on D3
touch = touchio.TouchIn(board.D3)

# NeoPixel strip (of 16 LEDs) connected on D4
NUMPIXELS = 16
neopixels = neopixel.NeoPixel(board.D4, NUMPIXELS, brightness=0.2, auto_write=False)

# Used if we do HID output, see below
kbd = Keyboard()

######################### HELPERS ##############################

# Helper to convert analog input to voltage
def getVoltage(pin):
    return (pin.value * 3.3) / 65536

# Helper to give us a nice color swirl
def wheel(pos):
    # Input a value 0 to 255 to get a color value.
    # The colours are a transition r - g - b - back to r.
    if (pos < 0):
        return (0, 0, 0)
    if (pos > 255):
        return (0, 0, 0)
    if (pos < 85):
        return (int(pos * 3), int(255 - (pos*3)), 0)
    elif (pos < 170):
        pos -= 85
        return (int(255 - pos*3), 0, int(pos*3))
    else:
        pos -= 170
        return (0, int(pos*3), int(255 - pos*3))

######################### MAIN LOOP ##############################

i = 0
while True:
  # spin internal LED around! autoshow is on
  dot[0] = wheel(i & 255)

  # also make the neopixels swirl around
  for p in range(NUMPIXELS):
      idx = int ((p * 256 / NUMPIXELS) + i)
      neopixels[p] = wheel(idx & 255)
  neopixels.show()

  # set analog output to 0-3.3V (0-65535 in increments)
  aout.value = i * 256

  # Read analog voltage on D0
  print("D0: %0.2f" % getVoltage(analog1in))

  # use D3 as capacitive touch to turn on internal LED
  if touch.value:
      print("D3 touched!")
  led.value = touch.value

  if not button.value:
      print("Button on D2 pressed!")
      # optional! uncomment below & save to have it sent a keypress
      #kbd.press(Keycode.A)
      #kbd.release_all()

  i = (i+1) % 256  # run from 0 to 255
  #time.sleep(0.01) # make bigger to slow down
動いている様子を見たい方はこちらの動画をどうぞ!😃
(^^)/~
CircuitPython が動く Adafruit Trinket M0 を買って動かしてみた。ちっさ!CircuitPython がプリインストールされていて、USB挿したらいきなり動いた。 なんとNeopixel がオンボード!SPRESENSEと連携したら何か面白いことできるかな。#CircuitPython #Adafurit #TrinketM0 pic.twitter.com/yb3sPqjhpq
— よしのたろう (@Taro_Yoshino) May 20, 2020
Adafruit Trinket M0(CircuitPython/Arduino IDE用)
- 出版社/メーカー: スイッチサイエンス
- メディア:
Adafruit Circuit Playground Express - Microsoft MakeCode 対応
- 出版社/メーカー: Adafruit
- メディア: エレクトロニクス
- 作者: Barela, Anne
- 出版社/メーカー: Make Community, LLC
- 発売日: 2018/09/12
- メディア: Kindle版
ys_taro さん

-
nice! 35196
記事 1099
テーマ 趣味・カルチャー
プロフィール
Contact Me


コメント 0