TensorFlow MNIST For ML Beginners をやってみた(1) [AI]
TensorFlow でいよいよ認識処理を試してみたいと思います。ニューラルネットワークの基本中の基本である手書き文字の認識が例題です。

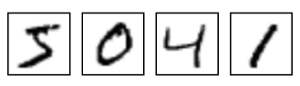
MNIST とは、その手書き文字を学習させるためのデータセットのことです。(MLとは Machine Learning のことです)例えばこんなデータが訓練用に6万点、テスト用に1万点、用意されています。
MNISTのデータは Yann LeCun's website からダウンロードすることができます。ダウンロードしてくるファイルは4種類あります。
train-images-idx3-ubyte.gz
train-labels-idx1-ubyte.gz
t10k-images-idx3-ubyte.gz
t10k-labels-idx1-ubyte.gz
これらをダウンロードしたら、MNIST_data というディレクトリを作って格納しておきます。解凍は必要はありません。
Deep Learning用のテストプログラムを用意します。TensorFlow GitHub Site からもダウンロードできます。
実際に動かしてみました。
素っ気ない結果ですね。何をしているかはソースコードを読み解くしかありません。大きな処理の流れは以下になります。
(1)MNISTデータを読み込み
(2)ニューラルネットワークの数式モデルを定義
(3)損失関数を設定
(4)学習データでネットワークを学習
(5)テストデータで結果を確認
という感じです。それぞれのコードを抜粋すると以下になります。
(1)MNISTデータの読み込み
最後の one_hot というのは、一つの正解だけが1でその他は0となるような設定のことです。
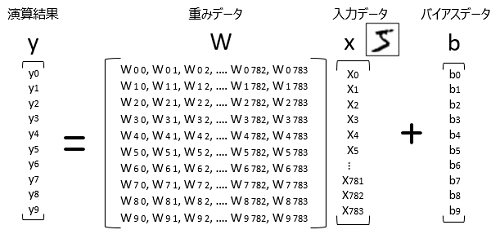
(2)ニューラルネットワークの数式モデルを定義
784 x 10 の配列が定義されていますが、これは、28pixel x 28pixel = 784 pixel の文字データ、0-9 の10個のデータを示しています。x は手書きデータの入力で、bはバイアス、yはその出力です。
(3)損失関数を設定
このニューラルネットワークの判定には、softmax 関数というものを使います。
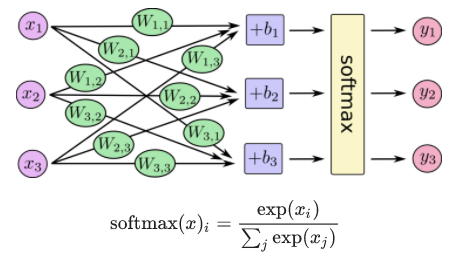
詳細の理屈は抜きにして、この場合、損失関数には cross_entropy という関数を使います。

(4)学習データでネットワークを学習
ここで batch というものが出てきました。この場合は100個データの損失関数を算出してその平均を学習用の損失データとして扱うという処理方法の様です。学習のための計算量を減らすことができると考えておけばよさそうです。
(5)テストデータで結果を確認
argmax(y, 1) というのはy行列の中から最大値を一つだけ抽出するというものです。yの計算結果と、 softmax の計算結果 y_ があっているかどうかで判定し、その判定結果の平均値から検出率を算出しています。
例えば、判定結果が [True,True,True,False,True,True,True,False,True,True] だとすると、検出率は0.8ということになります。
なんとなく処理の内容は見えてきました。次はどうやって学習しているのか詳しく見ていきたいと思います。しかし、行列演算のオンパレードで難しいなぁ。
σ(ー_ ー;
")

")
MNIST とは、その手書き文字を学習させるためのデータセットのことです。(MLとは Machine Learning のことです)例えばこんなデータが訓練用に6万点、テスト用に1万点、用意されています。
MNISTのデータは Yann LeCun's website からダウンロードすることができます。ダウンロードしてくるファイルは4種類あります。
train-images-idx3-ubyte.gz
train-labels-idx1-ubyte.gz
t10k-images-idx3-ubyte.gz
t10k-labels-idx1-ubyte.gz
これらをダウンロードしたら、MNIST_data というディレクトリを作って格納しておきます。解凍は必要はありません。
Deep Learning用のテストプログラムを用意します。TensorFlow GitHub Site からもダウンロードできます。
# Copyright 2015 The TensorFlow Authors. All Rights Reserved.
#
# Licensed under the Apache License, Version 2.0 (the "License");
# you may not use this file except in compliance with the License.
# You may obtain a copy of the License at
#
#     http://www.apache.org/licenses/LICENSE-2.0
#
# Unless required by applicable law or agreed to in writing, software
# distributed under the License is distributed on an "AS IS" BASIS,
# WITHOUT WARRANTIES OR CONDITIONS OF ANY KIND, either express or implied.
# See the License for the specific language governing permissions and
# limitations under the License.
# ==============================================================================

"""A very simple MNIST classifier.
See extensive documentation at
https://www.tensorflow.org/get_started/mnist/beginners
"""
from __future__ import absolute_import
from __future__ import division
from __future__ import print_function

import argparse
import sys
import os
os.environ['TF_CPP_MIN_LOG_LEVEL']='2'

from tensorflow.examples.tutorials.mnist import input_data

import tensorflow as tf

FLAGS = None


def main(_):
  # Import data
  mnist = input_data.read_data_sets(FLAGS.data_dir, one_hot=True)

  # Create the model
  x = tf.placeholder(tf.float32, [None, 784])
  W = tf.Variable(tf.zeros([784, 10]))
  b = tf.Variable(tf.zeros([10]))
  y = tf.matmul(x, W) + b

  # Define loss and optimizer
  y_ = tf.placeholder(tf.float32, [None, 10])

  # The raw formulation of cross-entropy,
  #
  #   tf.reduce_mean(-tf.reduce_sum(y_ * tf.log(tf.nn.softmax(y)),
  #                                 reduction_indices=[1]))
  #
  # can be numerically unstable.
  #
  # So here we use tf.nn.softmax_cross_entropy_with_logits on the raw
  # outputs of 'y', and then average across the batch.
  cross_entropy = tf.reduce_mean(
      tf.nn.softmax_cross_entropy_with_logits(labels=y_, logits=y))
  train_step = tf.train.GradientDescentOptimizer(0.5).minimize(cross_entropy)

  sess = tf.InteractiveSession()
  tf.global_variables_initializer().run()
  # Train
  for _ in range(1000):
    batch_xs, batch_ys = mnist.train.next_batch(100)
    sess.run(train_step, feed_dict={x: batch_xs, y_: batch_ys})

  # Test trained model
  correct_prediction = tf.equal(tf.argmax(y, 1), tf.argmax(y_, 1))
  accuracy = tf.reduce_mean(tf.cast(correct_prediction, tf.float32))
  print(sess.run(accuracy, feed_dict={x: mnist.test.images,
                                      y_: mnist.test.labels}))

if __name__ == '__main__':
  parser = argparse.ArgumentParser()
  parser.add_argument('--data_dir', type=str, default='/tmp/tensorflow/mnist/input_data',
                      help='Directory for storing input data')
  FLAGS, unparsed = parser.parse_known_args()
  tf.app.run(main=main, argv=[sys.argv[0]] + unparsed)
実際に動かしてみました。
C:\Users\Taro\Documents\TensorFlow>python mnist_softmax.py --data_dir MNIST_data
Extracting MNIST_data\train-images-idx3-ubyte.gz
Extracting MNIST_data\train-labels-idx1-ubyte.gz
Extracting MNIST_data\t10k-images-idx3-ubyte.gz
Extracting MNIST_data\t10k-labels-idx1-ubyte.gz
0.9206
素っ気ない結果ですね。何をしているかはソースコードを読み解くしかありません。大きな処理の流れは以下になります。
(1)MNISTデータを読み込み
(2)ニューラルネットワークの数式モデルを定義
(3)損失関数を設定
(4)学習データでネットワークを学習
(5)テストデータで結果を確認
という感じです。それぞれのコードを抜粋すると以下になります。
(1)MNISTデータの読み込み
mnist = input_data.read_data_sets(FLAGS.data_dir, one_hot=True)
最後の one_hot というのは、一つの正解だけが1でその他は0となるような設定のことです。
(2)ニューラルネットワークの数式モデルを定義
  x = tf.placeholder(tf.float32, [None, 784])
  W = tf.Variable(tf.zeros([784, 10]))
  b = tf.Variable(tf.zeros([10]))
  y = tf.matmul(x, W) + b
784 x 10 の配列が定義されていますが、これは、28pixel x 28pixel = 784 pixel の文字データ、0-9 の10個のデータを示しています。x は手書きデータの入力で、bはバイアス、yはその出力です。
(3)損失関数を設定
cross_entropy = tf.reduce_mean( tf.nn.softmax_cross_entropy_with_logits(labels=y_, logits=y))
このニューラルネットワークの判定には、softmax 関数というものを使います。
詳細の理屈は抜きにして、この場合、損失関数には cross_entropy という関数を使います。
(4)学習データでネットワークを学習
 for _ in range(1000):
    batch_xs, batch_ys = mnist.train.next_batch(100)
    sess.run(train_step, feed_dict={x: batch_xs, y_: batch_ys})
ここで batch というものが出てきました。この場合は100個データの損失関数を算出してその平均を学習用の損失データとして扱うという処理方法の様です。学習のための計算量を減らすことができると考えておけばよさそうです。
(5)テストデータで結果を確認
correct_prediction = tf.equal(tf.argmax(y, 1), tf.argmax(y_, 1))
accuracy = tf.reduce_mean(tf.cast(correct_prediction, tf.float32))
print(sess.run(accuracy, feed_dict={x: mnist.test.images, y_: mnist.test.labels}))
argmax(y, 1) というのはy行列の中から最大値を一つだけ抽出するというものです。yの計算結果と、 softmax の計算結果 y_ があっているかどうかで判定し、その判定結果の平均値から検出率を算出しています。
例えば、判定結果が [True,True,True,False,True,True,True,False,True,True] だとすると、検出率は0.8ということになります。
なんとなく処理の内容は見えてきました。次はどうやって学習しているのか詳しく見ていきたいと思います。しかし、行列演算のオンパレードで難しいなぁ。
σ(ー_ ー;
TensorFlowはじめました 実践!最新Googleマシンラーニング (NextPublishing)
- 出版社/メーカー: インプレスR&D
- 発売日: 2016/07/29
- メディア: Kindle版
ゼロから作るDeep Learning ―Pythonで学ぶディープラーニングの理論と実装
- 作者: 斎藤 康毅
- 出版社/メーカー: オライリージャパン
- 発売日: 2016/09/24
- メディア: 単行本(ソフトカバー)
TensorFlow機械学習クックブック Pythonベースの活用レシピ60+ (impress top gear)
- 作者: Nick McClure
- 出版社/メーカー: インプレス
- 発売日: 2017/08/14
- メディア: 単行本(ソフトカバー)
ys_taro さん

-
nice! 35196
記事 1099
テーマ 趣味・カルチャー
プロフィール
Contact Me


む、難しい・・・でも、とても便利なのは分かりました(^^)
使いこなせると面白そう。
by ワンモア (2017-09-12 23:08)
ワンモアさん、そうなんですよー。とっても難しくて、文献読み解くのも一苦労です。でも、Deep Learning を学べば学ぶほど、これからのプログラミングのスタイルって変わっていくんだろうなと実感します。まさにビッグデータの時代ですね。
by ys_oota (2017-09-12 23:59)